DIY Wood Pumpkin Craft
This DIY Wood Pumpkin Craft can be made using a Dollar Tree Tumbling Tour Game to create this easy and frugal fall craft. If you’re looking for more inexpensive pumpkin crafts, check out this Scrap Fabric Pumpkin Decor.

We participate in other affiliate programs and we may earn a small commission if you make a purchase.
If you want to decorate your home for the upcoming fall season, you can’t go wrong with these easy and cute pumpkins made from blocks in the Dollar Tree Tumbling Tower Game!
This DIY Wood Pumpkin Craft is a quick and easy way to bring a little bit of fall flair into your home just in time for autumn.
You can easily display these little pumpkins on a candlestick, galvanized bucket or stick them DIY Wood Tiered Tray for a beautiful statement piece.
✂️Supplies Needed
Be sure to check out my Juggling Act Mama Storefront on Amazon where you’ll find all kinds of great products to make your life easier! Thanks so much for being a part of Juggling Act Mama ❤
- blocks from the Dollar Tree Tumbling Tower game – 16 blocks for each pumpkin
- small wood craft cubes – 1 for each pumpkin
- Hot glue gun
- Hot glue stick
- Cream paint
- Orange paint
- Brown paint
- Green paint
- Paint brushes (foam, chunky and regular)
- Leaves from faux flowers

📝Instructions
This is meant to be a brief overview of this DIY Wood Pumpkin Craft project. For step-by-step instructions and a full printable tutorial with materials, please scroll down to the teal box below.
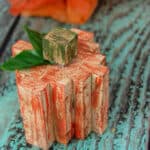
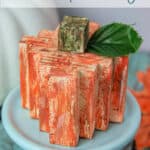
Assembling the Pumpkin Block
- Lay the blocks out in the following combinations: 2 single blocks, 2 blocks of 2, 2 blocks of 3, and one block of 4.
- Glue the multiple block sections together.
- Layer your sections together and glue – 4 goes in the middle, then 3, then 2 and then 1. Do this on both sides of the block of 4.

Finishing the Pumpkins
- Start by coating the wood block all over with the cream colored paint using the foam brush.
- Next, use a large brush to lightly brush on the orange color. If you prefer, you can skip the cream and just paint your pumpkin a solid orange color.
- After that, paint the wood cube that will act as the stem using the cream colored paint again.
- The last painting step is to add the brown and green to the stem.
- Once the paint has dried, glue the artificial leaves to the top of the pumpkin block.
- Finally, glue the wood cube on the top.

⭐ Tips
Always take care when using a hot glue gun so as not to burn yourself. If you are making this with children, I advise that an adult does the gluing, and the children do the painting.
Personally, I like to use Apple Barrel paints. For this project, I used Antique White, Harvest Orange, Nutmeg Brown, and English Ivy Green.
Variations
One of the best things about crafting is making a project your own! If you want, you can change the shape and size of the pumpkin by changing the number of blocks and their position.
Of course, you can also change colors to fit your décor as well. If you participate in the Teal Pumpkin Project, you could paint a couple in different shapes of teal. (Find more DIY Teal Pumpkin Project Decorations here.)
You could also add just a little glitter with Mod Podge Sparkle.
For a more glamourous look, use Glitter Acrylic Paint instead, or in addition to the regular paint.
💭 Frequently Asked Questions
Here are some questions (and answers!) readers often ask about making this DIY Wood Pumpkin Craft.
Each block is 2-inches long by 2-inches wide.
There are 72 pieces in the Dollar Tree Tumbling Tower game. Therefore, you can make 4 of these cute little pumpkins with one set, with a few blocks leftover.
Water-based acrylic paint is most often used to paint wood crafts. I like them because they work well for a lot of projects, and the paint is, for the most part, easy to clean up.

Similar Projects
Here are some other DIY projects that are perfect for Fall you might also enjoy:
- Easy 5 Minute DIY Fall Wreath – rustic and charming with a pop of color.
- DIY Pumpkin Paper Garland Project – add an easy Fall pick me up to your mantel.
- How to Make Fabric Coasters – a simple sewing project that makes a great gift.
- Scrap Fabric Pumpkin Decor – use up your fabric scraps with this simple no-sew craft project.
If you like crafting with inexpensive materials from Dollar Tree, check out these crafts:

📋 Tutorial
Not ready to make DIY Wood Pumpkin Craft yet? Don’t forget to pin this project for later! When you do make it, please be sure to tag me on Instagram @jugglingactmama or #jugglingactmama – I’d love to see your pictures!

DIY Wood Pumpkin Craft
As an Amazon Associate, I earn from qualifying purchases.
Equipment
- Hot glue gun
- Hot glue stick
- Paint brushes (foam, chunky and regular)
Materials
- 16 blocks from the Dollar Tree Tumbling Tower game
- 1 small wooden craft cube
- Craft paint Orange, Cream, Brown, Green
- Leaves from faux flowers
Instructions
Assembling the Pumpkin Block
- Lay the blocks out in the following combinations: 2 single blocks, 2 blocks of 2, 2 blocks of 3, and one block of 4.
- Glue the multiple block sections together.
- Layer your sections together and glue – 4 goes in the middle, then 3, then 2 and then 1. Do this on both sides of the block of 4.
Finishing the Pumpkins
- Start by coating the wooden block all over with the cream colored paint using the foam brush.
- Next, use a large brush to lightly brush on the orange color. If you prefer, you can skip the cream and just paint your pumpkin a solid orange color.
- After that, paint the wood cube that will act as the stem using the cream colored paint again.
- The last painting step is to add the brown and green to the stem.
- Once the paint has dried, glue the artificial leaves to the top of the pumpkin block.
- Finally, glue the wood cube on the top.