DIY Teal Pumpkin Project Decorations

Making this wooden sign for my porch for Halloween is the perfect way to let our friends and neighbors know that we support the Teal Pumpkin Project.
This post has been sponsored by Wagner SprayTech, however, all opinions are my own. Please see my Disclosure policy for more information. #ad #Wagner #TealPumpkinProject
DIY Teal Pumpkin Project Decorations
If you saw my Fall Porch Decorating Ideas post, then you know that I really LOVE decorating for Fall. I enjoy Halloween, too, but I’m not really into the spooky part as much. Today I’m going to show you how to create a couple of easy Teal Pumpkin Project decorations for your front porch.

What is the Teal Pumpkin Project?
If you don’t have a child with allergies, than you may not have heard of the Teal Pumpkin Project before. It’s a movement that seeks to include all trick-or-treaters, even if they cannot eat food treats.
It was started by Food Allergy Research & Education to provide a safer Halloween experience for children with food allergies.

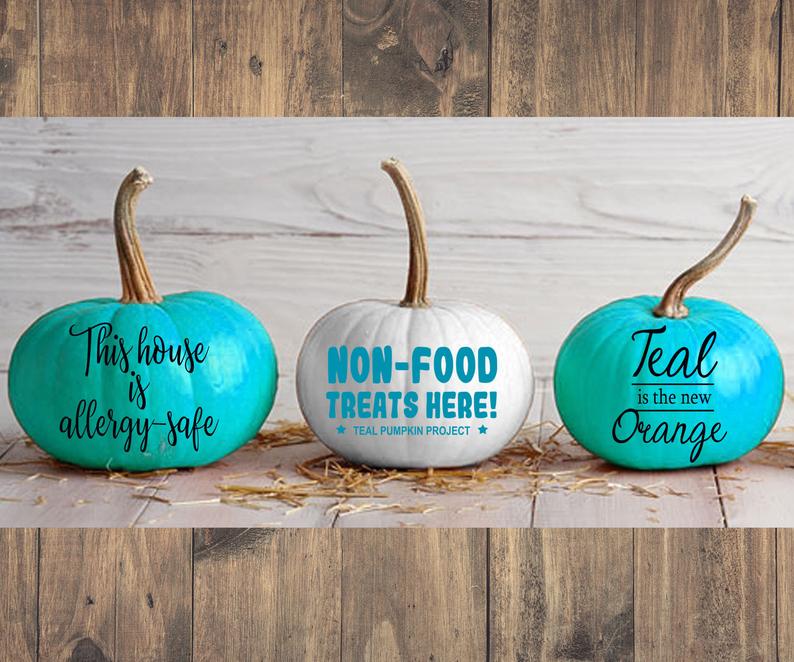
A teal pumpkin signifies that you have non-food treats available such as Halloween pencils, glow sticks, and small toys.
FARE
Why we Participate in the Teal Pumpkin Project
I’ve written about the importance of the Teal Pumpkin Project in the past. While neither of my children have food allergies, my nephew and several of our friends do.

Providing non-food treats means including all kids in the trick-or-treating fun without anyone feeling left out or different.
No child should ever feel this way, especially not on a fun holiday like Halloween.
How can I support the Teal Pumpkin Project?
- Provide non-food treats for trick-or-treaters (something simple like these 5 Minute Magnets would be a fun DIY option)
- Place a teal pumpkin in front of your home so families know you have non-food items.
- Download a variety of signs, flyers and more here.
- Share online using the hashtag #TealPumpkinProject to help spread awareness.
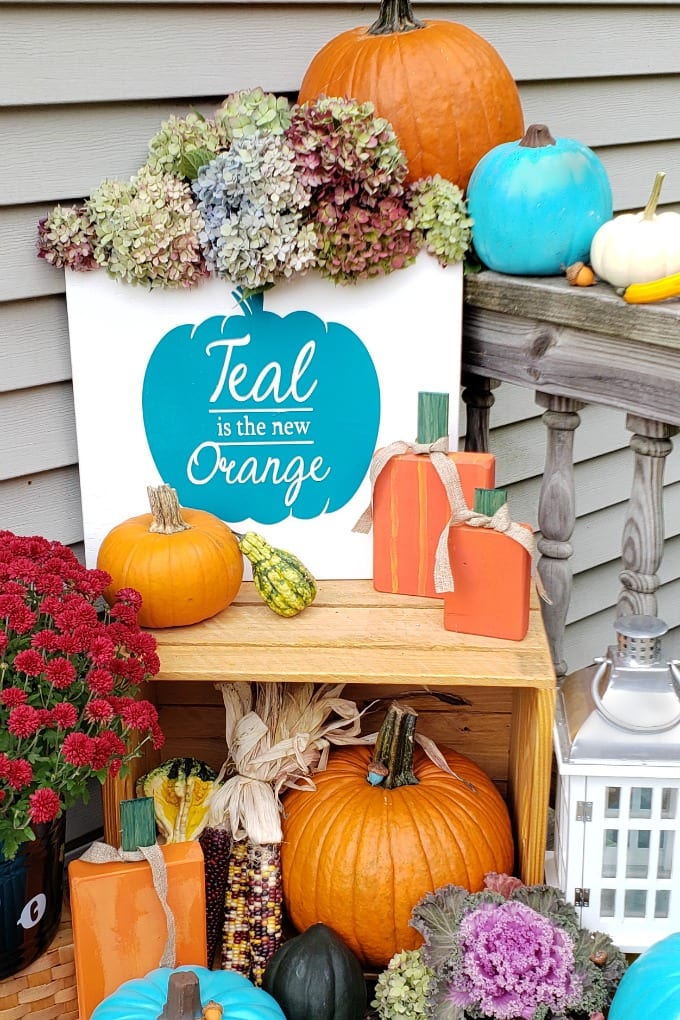
Teal Pumpkin Project Decorations
I had some leftover Behr Premium Plus Ultra “Caicos Turquoise” from my Cinder Block Shelves project earlier in the summer, so I used that to spray some pumpkins I picked up at the craft store.
Using the medium spray shelter made it easy to spray the pumpkins and not have to worry about overspray as it was a little breezy that day. I adore the way these came out!

Easy DIY Wooden Sign
For this project, I used my Flexio 4000 sprayer, which is so simple to use. I had it on hand for another project I’m working on for my children’s bedrooms (coming soon), so I took 5 minutes to spray this piece of wood.
The Flexio 4000 is easy to maneuver and lightweight. Here are some of the other things I love about it:
- 10X faster than a brush
- Spray paints and stains right from the can
- More paint control for less mess
- Great for indoor and outdoor projects
- Easy 5-minute cleanup
Materials and Tools
- orbital sander
- 100 grit sandpaper disks
- dust mask and safety glasses
- Flexio 4000 sprayer
- white paint
- square plywood
- teal vinyl
Vinyl Decals
If you have a Cricut machine, you can purchase teal vinyl and make your own fun designs. If not, check out this Etsy shop that has awesome decals for Halloween, including the Teal Pumpkin Project. And how cute would a DIY Paper Pumpkin Garland look in teal at your Halloween party?
How to Make a Teal Pumpkin Project Wooden Sign
- Sand the square plywood so it is smooth and remove any dust.
- Set up the Flexio 4000 according to the instructions.
- Set the pressure control on the X-Boost power dial to medium-high. This controls how much airpower is created by the base.
- Set the material flow, which controls the amount that will be sprayed. Because latex paint is quite thick, you want it to be about 8-10.
- Next, change the air cap to match the direction you’re going to paint, either horizontal or vertical.
- Add paint to the cup and tighten the nozzle assembly.
- Set up your workspace. I found it was easiest to paint this plywood by propping it up against my sawhorse.
- Now you’re ready to paint! Hold the sprayer about 6-8 inches from the surface and move the sprayer in smooth even passes across your surface.
- Once the paint is dry, you can add the vinyl.
- Place your decal upside down and rub all parts of the graphic, which will help to ensure that it sticks to the transfer tape.
- Carefully peel off the white backing layer from the decal, leaving the vinyl and thin transfer layer.
- Once the paint is completely dry, place the decal onto the center of the board.
- Use the credit card again to smooth the decal onto the board working from the center to the outside.
- Starting at once corner, carefully remove the clear transfer tape so that only the decal remains.


How do you Paint a Teal Pumpkin?
Using the Flexio 4000, I was able to quickly spray these three pumpkins teal.
- Tape off the tops of the pumpkins.
- Set up the Wagner Flexio 4000 using teal paint.
- Adjust the settings for material flow and pressure control.
- Tip the pumpkins upside down and start by spraying the bottom.
- Once dry, flip the pumpkins and spray the tops.
- Allow to try completely before moving.
- Remove the tape and discard it.
- Touch up any spots you need to using a small craft paintbrush.

Tips for Using the Flexio 4000
For the best results, I highly suggest thoroughly reading through the instructions on how to assemble and use the sprayer. Likewise, be sure to do a test spray and practice with the included spray poster. Here are some other tips:
- First, choose a good quality paint, I used Behr Premium Plus Ultra in white for the sign.
- Take the time to set up the Flexio 4000 sprayer correctly – find INSTRUCTIONS AND TIPS HERE.
- Hold the sprayer about 6-8 inches from the surface and move the sprayer in smooth even passes across your surface.
- Allow the paint to dry completely before adding another coat or touching up any spots.


More Wagner Projects

You might also enjoy…
Sweet Red Poppy has more adorable DIY Teal Pumpkin Project ideas, using glitter, ribbons, fabric and even rhinestones. Here are a few more fun Fall ideas:
Love it!! Thanks SO much for helping to safely include all children on Halloween!! I hadn’t thought of making our own sign before!!
Love this!!! So super cute!
Sooo cute! Love your fall decor and I LOVE that you and the teal pumpkin project work to make Halloween safe and fun for all kids. ❤️
That sign is so fun!
This is so pretty – love it!