Scrap Fabric Pumpkin Décor
This simple no-sew fall scrap fabric pumpkin is an easy DIY that kids or adults can make.

Next time, you might also like to make this DIY Wood Pumpkin Craft.
As I’m starting to pull out my fall decor and dig through last year’s goodies, I realized that I need something cozy and fun to add to my otherwise mostly orange fall decor. This easy scrap fabric pumpkin DIY was just the thing!
It looks super cute on my DIY Wood Tiered Tray (Dollar Tree Craft) next to this Clothespin Craft (DIY Basket) filled with dried hydrangeas from my garden.
This scrap fabric pumpkin requires no sewing, and you can even use this DIY to use up that leftover fabric from projects past! If you don’t have any scrap fabric lying around, you could easily use old shirts, blankets, or even a table runner that won’t make it another season. All you need is a small handful of materials, some of which you probably have at home, and a hot glue gun to get started!
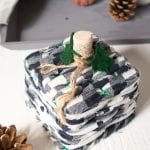
While this simple scrap fabric pumpkin might be a mostly leftover scraps kind of project, the end result looks like a high-end piece you might find at Home Goods or Hobby Lobby! The buffalo check pattern’s unique look was the perfect cozy fall flannel look I was hoping for, and it’s a nice break from the usual fall colors like brown and orange.
If you don’t have any leftover buffalo check print, you can use ANY color fabric! Seriously, make hot pink scrap pumpkins or baby blue pumpkins if they’re all the scrap fabric you have! What I love about this craft is how simple it is to make and how versatile your fabric pumpkins will be!

Since my crafty readers love this Fabric Coasters Tutorial, I think this fun upcycled scrap fabric pumpkin “basket” will be a hit, too!
Make a Scrap Fabric Pumpkin
Materials
- plastic strawberry basket, 1 quart size
- woven scrap fabrics in coordinating colors and patterns such as flannel checks and polka dots
- fabric scissors
- hot glue gun with clear glue sticks
- wine cork
- green felt sheet or scrap
- printable pumpkin leaf patterns
- twine

Instructions
Preparing the Materials:
- Gather supplies.
- Cut fabric into 1” wide strips at least the length of the basket circumference.
- If using woven materials, clip the ends of the fabric and tear the two sides apart with your hands to create frayed edges.
- Turn the strawberry basket upside down, the bottom is now the top of the pumpkin.
- Cut out the pumpkin pieces using the printable pattern and a piece of green felt.
Weaving the Fabric:
- Begin weaving the fabric strips at the “top” of the pumpkin. Starting at one end of the backet, thread the fabric strip through one slat and loop it back down another slat.
- Continue threading the fabric strip through the slats in the basket.
- Wrap the fabric strip around and continue back in the opposite direction until the top is fully woven.
- Pull the fabric strips tight and if needed glue the ends to secure.
- Repeat in a similar pattern around the sides of the basket, alternating between the two different fabrics.
- Push the woven fabric up to top to squeeze in as many rows of fabric as possible.
- When at the bottom of the basket, wrap the fabric around the bottom edge to hide the plastic as much as possible.
- Using a hot glue gun, glue the ends of the fabric strips to secure in place on the underside.
Finishing the Scrap Fabric Pumpkin:
- Add a bit of hot glue to the end of the wine cork and press it in place at the center. Move fabric aside to glue the cork directly onto the plastic basket.
- Cut a piece of twine approx. 25” long, fold it in half and wrap it around the cork and knot the ends.
- Glue the felt pumpkin leaves to the cork stem to finish.
More Fall DIY Projects
If you’re crazy about buffalo plaid, you’ll want to check out these 14 buffalo plaid decor projects! Here are some other great Fall DIY projects you may like:
- Fall Porch Decorating Ideas
- Easy DIY Pumpkin Tealights
- Fabric Coasters (pictured below)
- Easy 5 Minute DIY Fall Wreath


Scrap Fabric Pumpkin Decor
As an Amazon Associate, I earn from qualifying purchases.
Equipment
- plastic strawberry basket, 1 quart size
- woven scrap fabrics in coordinating colors and patterns such as flannel checks and polka dots
- fabric scissors
- hot glue gun with clear glue sticks
- wine cork
- green felt sheet or scrap
- printable pumpkin leaf patterns
- twine
Instructions
Gather supplies.
- Cut fabric into 1” wide strips at least the length of the basket circumference.
- If using woven materials, clip the ends of the fabric and tear the two sides apart with your hands to create frayed edges.
- Turn the strawberry basket upside down, the bottom is now the top of the pumpkin.
- Cut out the pumpkin pieces using the printable pattern and a piece of green felt.
Weaving the Fabric:
- Begin weaving the fabric strips at the “top” of the pumpkin. Starting at one end of the backet, thread the fabric strip through one slat and loop it back down another slat.
- Continue threading the fabric strip through the slats in the basket.
- Wrap the fabric dtrip around and continue back in the opposite direction until the top is fully woven.
- Pull the fabric strips tight and if needed glue the ends to secure.
- Repeat in a similar pattern around the sides of the basket, alternating between the two different fabrics.
- Push the woven fabric up to top to squeeze in as many rows of fabric as possible.
- When at the bottom of the basket, wrap the fabric around the bottom edge to hide the plastic as much as possible.
- Using a hot glue gun, glue the ends of the fabrics strips to secure in place on the underside.
Finishing the Scrap Fabric Pumpkin:
- Add a bit of hot glue to the end of the wine cork and press it in place at the center. Move fabric aside to glue the cork directly onto the plastic basket.
- Cut a piece of twine approx. 25” long, fold it in half and wrap it around the cork and knot the ends.
- Glue the felt pumpkin leaves to the cork stem to finish.