• Skip to primary navigation
  • Skip to main content
  • Skip to primary sidebar
  • Skip to footer
  • Home
  • About
    • Privacy Policy
    • Work with Me
  • Recipes
    • Recipe Index
    • My Favorite Kitchen Tools
    • Menu Planner
  • Lifestyle
    • DIY Crafts
    • Bath & Beauty
    • Busy Moms Survival Guide
    • Family Finances
    • Home Decor
    • Parenting
    • Gardening & Outdoor Living
    • Kids
    • Printables
  • Travel
    • Family Travel
    • Travel Activities
    • Romantic Getaways
    • New England
  • Subscribe

Juggling Act Mama logo

Home » Lifestyle » DIY » DIY Decor » Grapevine Easter Wreath

February 17, 2021

Grapevine Easter Wreath

Pin
Share
Tweet
Share
15Shares

As an Amazon Associate, I earn from qualifying purchases.

How to Make an Easter Wreath - if you enjoy making your own home decor, you'll love this Grapevine Easter Wreath tutorial! It is a simple and inexpensive way to add a little Easter charm to your home. via @jugglingactmamaHow to Make an Easter Wreath - if you enjoy making your own home decor, you'll love this Grapevine Easter Wreath tutorial! It is a simple and inexpensive way to add a little Easter charm to your home. via @jugglingactmamaHow to Make an Easter Wreath - if you enjoy making your own home decor, you'll love this Grapevine Easter Wreath tutorial! It is a simple and inexpensive way to add a little Easter charm to your home. via @jugglingactmamaHow to Make an Easter Wreath - if you enjoy making your own home decor, you'll love this Grapevine Easter Wreath tutorial! It is a simple and inexpensive way to add a little Easter charm to your home. via @jugglingactmama

How to Make an Easter Wreath – if you enjoy making your own home decor, you’ll love this Grapevine Easter Wreath tutorial! It is a simple and inexpensive way to add a little Easter charm to your home.

A grapevine wreath decorated with yellow and white silk follower and faux carrots for Easter on a white wood background.

This simple Easter wreath is a great beginner project if you’re new to crafting, or if you don’t want to have to clean up a big mess afterward. Easy, inexpensive and pretty DIY projects are always my favorite!

One of the great things about grapevine wreaths is that I rarely need to use any sort of adhesive. With all the little nooks and crevices, you can just tuck your flowers and other decor into the grapevine. That means, you can easily change it up for other holidays or seasons!

Before we get into this project, I want to share with you a few reader favorites for Easter time!

Easter DIY Projects

  • Easter Cricut Projects – a whole collection of beautiful Cricut crafts you can make to help celebrate Easter.
  • You’ll love these awesome Easter Eggs Decorating Ideas that go way beyond little cups of dye!

Grapevine Easter Wreath Materials

  • Grapevine Wreath (18 inches) I got mine from Joanne’s with a coupon
  • Wire cutters
  • 2 sets of white flowers- Dollar Tree
  • 2 sets of yellow flowers- Dollar Tree
  • 2 sets of the yellow and orange carrots- Dollar Tree

You could make this wreath with any color silk flowers you like. Any pastel colors would look beautiful with this, I think!

How to Make an Easter Wreath - all the materials needed to make a Grapevine Easter Wreath including a bare grapevine wreath, yellow and white silk flowers, wire cutters and faux craft carrots.

How to Make an Easter Wreath

STEP 1: Using the wire cutters, cut all of the flowers off of the stem. Cut about 4 inches after each flower.

How to Make an Easter Wreath - wire cutters snipping off part of the stem on yellow silk flowers.

STEP 2: I started just a little to the right of the bottom middle of the wreath with 3 yellow flowers, because this wreath has lots of crevasses, you can just tuck the stem of the flower into the grapevine. I alternated the flowers.

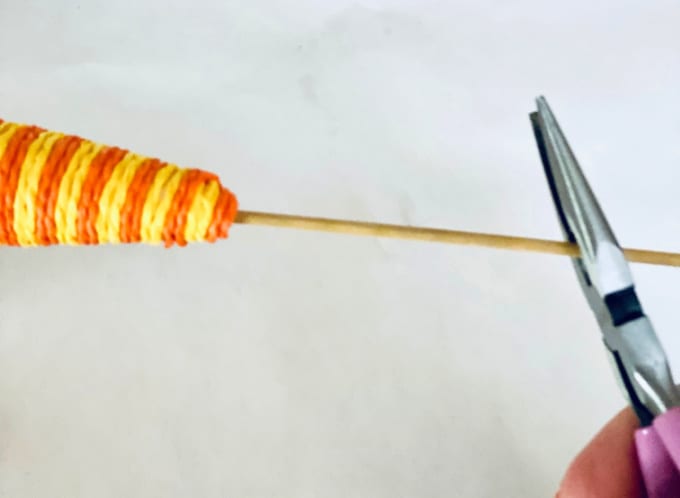
STEP 3: After using all of the flowers, I used the wire cutters to trim down the carrots. You could also use a knife as this is wood but I liked using the wire cutters as it cut easier.

How to Make an Easter Wreath - wire cutters snipping off part of the stick on the craft carrot.

STEP 4: Trim three of the carrots and then place on the right side of the flowers on the bottom. That’s it! Not bad, right?

This project took me about a half hour, but I admit I was being fussy on a couple things so you could probably even finish it quicker!

More DIY Wreath Projects

If you loved this Grapevine Easter Wreath craft, you might also like to check out one of these projects:

  • DIY Succulent Wreath Tutorial from Juggling Act Mama
  • Easter Egg DIY Dollar Store Wreath from The DIY Mommy
  • DIY Crochet Easter Bunny Hoop from Julie Measures
  • Spring Embroidery Hoop Wreath from Juggling Act Mama
Pin
Share
Tweet
Share
15Shares

Filed Under: DIY, DIY Decor, Easter, Holidays, Lifestyle Tagged With: diy, DIY Decor, DIY project, easter, Easter decor, spring, Wreath

Reader Interactions

Leave a Reply Cancel reply

Your email address will not be published. Required fields are marked *

Recipe Rating


Primary Sidebar

Welcome! I'm Ang - the Juggling Act Mama! I love sharing quick and easy recipes, creative DIY projects, and fun family travel with you. Like many of you, I am a multi-tasking mama juggling priorities which are why here I offer solutions to tame your hectic lifestyle. Read More…

Popular Posts

Slices of oven roasted pork tenderloin on a cutting board with a sprig of fresh thyme. In the background are slices of compound butter and ramekins with salt and pepper
Grilled Petite Sirloin Steak on a cutting board. Int he background, a blue towel and a small green ramekin with Cowboy Steak Rub with a wooden spoon.
Authentic Italian Meatballs topping a bowl of spaghetti with sauce.

Footer

More Blog Posts

Copyright Notice · Disclosure · Privacy Policy · Republication Policy · Terms and Conditions · Trademarks · Work with Me

JUGGLING ACT MAMA IS A LIFESTYLE BLOG FOR BUSY MOMS THAT WANT TO DO IT ALL. ENJOY AMAZING RECIPES, FANTASTIC PROJECTS
AND INCREDIBLE TRAVEL IDEAS FOR LIVING YOUR BEST LIFE.


Copyright © 2021 Juggling Act Mama · Log in