DIY Christmas Tree Decor Project
This DIY Christmas Tree decor project is the perfect way to use your left over materials to create a fun new piece to your holiday decor! Place the Christmas tree decor on your mantel, hearth or even a side table for buffet for a stylish addition to your holiday setup.
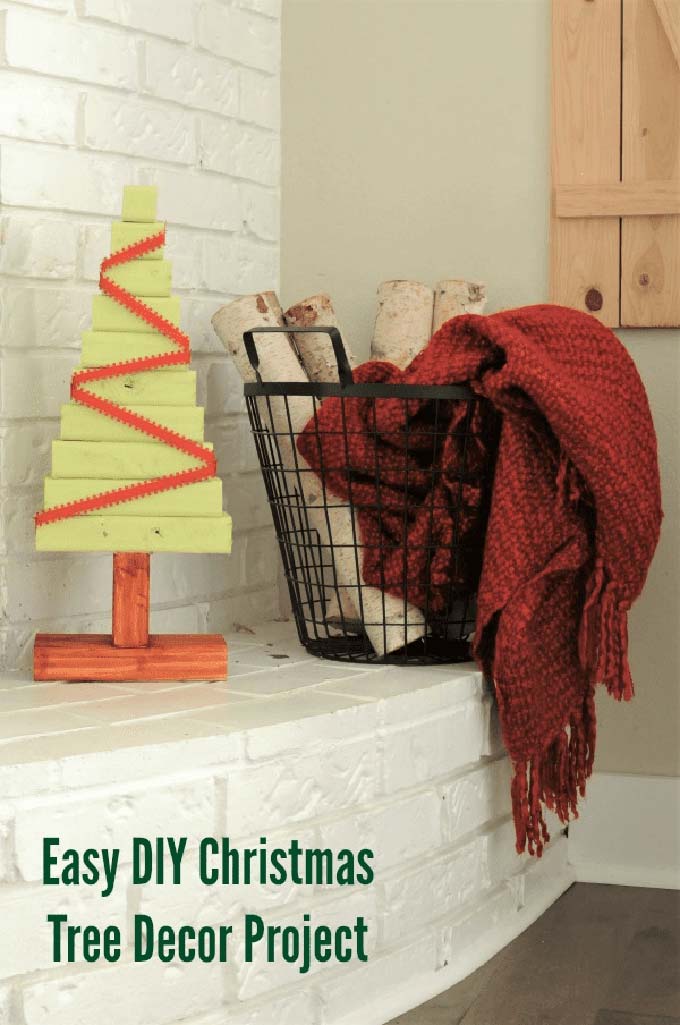
With the holidays approaching, one of my favorite ways to add new decor to my decorations is through making it! DIY decor is the most cost-effective ways to decorate in a new way each year. I’ve been dying to use up a bunch of our left-over 2×4 materials, so I whipped up this DIY Christmas Tree in an afternoon. It can easily be customized by changing up the height or colors to match your style and preferences. (You should also check out Ang’s tutorial on How to Make a Kissing Ball!)
How to Build a DIY Christmas Tree
In today’s tutorial, I’m going to show you exactly how to build yourself a fun DIY Christmas Tree for your holiday decor.
Materials Needed:
- 6’ Kiln-Dried 2×4
- 2” Wood Screws
- Green Paint
- Gel Stain
- Red Ribbon
Tools Required:
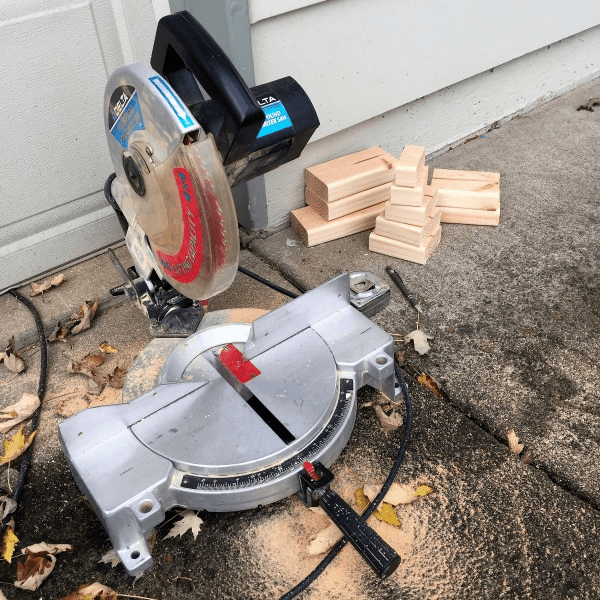
- Chop Saw
- Drill
- Paint Brush and Foam Brush
- Measuring Tape and Pen
- Industrial Stapler
Instructions for Building a DIY Christmas Tree:
STEP 1: Cut your 2×4 board.
Cut your 2×4 board into the following boards lengths:
8” (2), 7.25”, 6.5”, 5.75”, 5”, 4.25”, 3.5”, 2.75”, 2”, 1.25”, and 4”.
STEP 2: Screw the tree together.
Using your drill, screw the bottom stand and the bottom of the tree to the trunk. Then continue stacking and screwing the tree pieces into each other from the bottom up. For the very top piece, glue it on so that you don’t have a screw head on the top of your finished tree.

STEP 3: Paint and Stain.
After your tree is built, paint the top section green and stain the bottom trunk and stand. To reduce costs, I chose to use left over paint and stain from prior projects.

STEP 4: Staple on the ribbon.
The last step is to use a staple gun to install the red ribbon on the front. Start by stapling the beginning of the ribbon on the side of the second board from the top and then skip a few rows down, staple it on the other side, fold back and continue down to the bottom.
So, what do you think of my DIY Christmas Tree decor?
I love how it looks on my fireplace hearth. 🙂

I seriously love this DIY project – not only does it use left over materials (like 2x4s and paint/stain) but it is also fully customizable! Like more of a modern style? Paint it black and use a white or green ribbon. Want more of a rustic style? Use a darker green and then distress it a bit. Have fun with it!
Thanks to Ang again for having me over here at Juggling Act Mama! It’s always a pleasure!
If we haven’t met yet, let me introduce myself! My name is Rachel Joy and I blog over at Joyful Derivatives. I love teaching non-designers simple and affordable ways to create a home they love to spend time in and are proud to share with others. I write tutorials to teach people how to decorate or update their home at low costs, give tips on easy and inexpensive ways to decorate your home and share my passion for home design through room makeovers and home renovation projects.
A few of my most popular posts are “The Best Home Decor to Shop for at Thrift Stores” and “Magnolia Paints Color Matched to Behr“. If you enjoyed this post about how to make a DIY Christmas Tree, you’ll also enjoy my DIY String Art Board tutorial with free printable templates!
Let me know if you have any questions about this tutorial, and I hope to see you over at Joyful Derivatives!