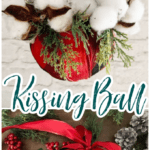
How to Make a Kissing Ball

Looking for an easy Christmas craft idea? Get our step-by-step tutorial on how to make an elegant kissing ball with just a few items this Christmas season!

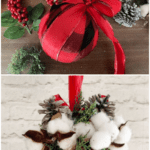
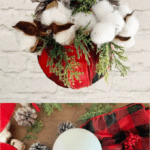
This Christmastime kissing ball is a fun décor item to hang in your home in lieu of mistletoe. Made with cheap supplies from Dollar Tree, this craft can be made in just an hour. A red buffalo check scarf, pine cones, and faux holiday greenery cover a Styrofoam ball. Hang this pretty decoration anywhere in your home where you wouldn’t mind getting stopped for a few smooches.
DIY Christmas Décor
The holidays are the perfect time of the year to get into the crafting spirit. It’s so much fun to decorate your home with handmade décor items. Homemade gifts are always appreciated and it’s fun to pull out the Christmas decorations every year and come across the fun ornaments and crafts that were made by family members many years ago.

✂️ Supplies Needed
The following are affiliate links. We are a participant in the Amazon Services LLC Associates Program, an affiliate advertising program designed to provide a means for us to earn fees by linking to Amazon.com and affiliated sites.
- 6 inch Styrofoam ball
- Red ribbon (approx. 4 ft)
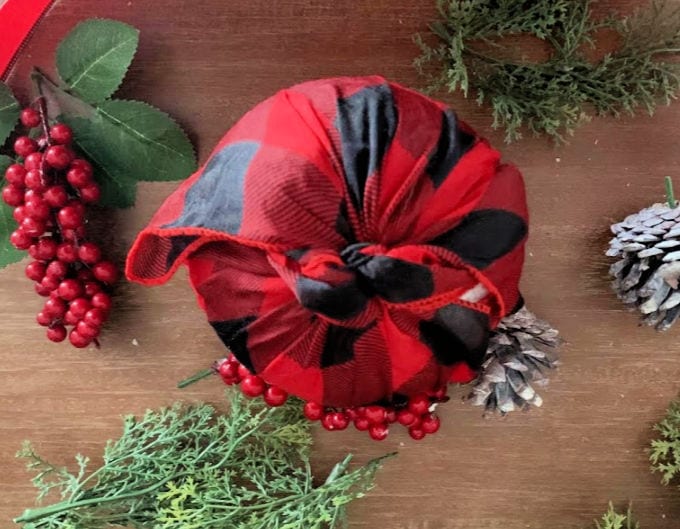
- 1 red buffalo check scarf
- Pinecones
- Faux greenery and flowers
- Faux cotton
- Hot glue gun
Be sure to check out my Juggling Act Mama Storefront on Amazon where you’ll find all kinds of great products that will make your life easier! Thanks so much for being a part of Juggling Act Mama ❤
You can probably find almost all the supplies for this craft at the dollar store. My local dollar tree just got in some really cute white and red buffalo check scarves that are perfect to wear or use for crafts.
You can use real evergreen branches for this craft but keep in mind that they won’t last for more than one season. Eventually, they will turn brown. Using fake branches and flowers will ensure that your Christmas kissing ball will last year after year.
Be sure to check out my Juggling Act Mama Storefront on Amazon where you’ll find all kinds of great products that will make your life easier! Thanks so much for being a part of Juggling Act Mama ❤
📝Instructions
This is meant to be a brief overview of how to make a kissing ball. For step-by-step instructions and a full printable tutorial with materials, please scroll down to the teal box below.
- Begin by wrapping the scarf around the foam ball and securing it with an elastic. Trim the excess to about 2 inches. Tuck and glue and spots with loose fabric as there may be some gaps showing the white ball underneath the scarf.
- Next, wrap the ribbon around the ball, criss-cross it on the other side of the ball and pull it back up and tie it securely. Tie the excess into a bow and let it hang
- Then, glue the pine cones on each of the four spaces at the top of the ball in between the ribbon.
- Glue the faux cotton underneath the pine cones.
- Add more greenery, flowers and to the top of the ball to make it look more full.
- Let the glue dry completely, and tie the loose ends of the ribbon together.
- Now you’re ready to hang it up!

💭 Frequently Asked Questions
Here are some questions (and answers!) readers often ask about how to make a kissing ball.
The history of Christmas Kissing Balls dates back to the time of the Middle Ages where the villagers would wind together twine and evergreen branches in the shape of a ball. They would then place a clay figure of the baby Jesus in the center and they were then known as holy boughs.
The village people would then hang their creations in castle passageways and the doorways of larger homes as a way to ensure blessings and good fortune to whoever passed underneath the holly bough and baby Jesus figure.
5 Places in your home to hang your new DIY décor besides above your bed:
In a Bay Window.
On the front Porch.
From a Chandelier.
In an Architectural Cut-Out.
Above a Mantle.

🎄 More Holiday Ideas
Here are a few more ideas perfect for the holidays:
- Holiday Cricut Projects – a Cricut couldn’t be easier to use at the holidays!
- Christmas Decor Printable – Believing is Seeing – add this gorgeous print to your home.
- DIY Advent Calendars and Activities – your family will love these ideas.
- Cutting Board Chalkboard Art – this makes a beautiful gift.
- DIY Clear Christmas Ornaments – a twist on the traditional ornament.
📋 How to Make a Kissing Ball
Not ready to make a kissing ball yet? Don’t forget to pin this project for later! When you do make it, please be sure to tag me on Instagram @jugglingactmama or #jugglingactmama – I’d love to see your pictures!

How to Make a Kissing Ball
As an Amazon Associate, I earn from qualifying purchases.
Equipment
- Hot glue gun
Materials
- 1 6 inch Styrofoam ball
- 4 ft Red ribbon
- 1 red buffalo check scarf
- Pinecones
- Faux greenery and flowers
- Faux cotton
- rubber elastic
- glue gun and glue
Instructions
- Begin by wrapping the scarf around the foam ball and securing it with an elastic. Trim the excess to about 2 inches. Tuck and glue and spots with loose fabric as there may be some gaps showing the white ball underneath the scarf.1 6 inch Styrofoam ball, 1 red buffalo check scarf, rubber elastic, glue gun and glue
- Next, wrap the ribbon around the ball, criss-cross it on the other side of the ball and pull it back up and tie it securely. Tie the excess into a bow and let it hang4 ft Red ribbon
- Then, glue the pine cones on each of the four spaces at the top of the ball in between the ribbon.Pinecones
- Glue the faux cotton underneath the pine cones.Faux cotton
- Add more greenery, flowers and to the top of the ball to make it look more full.Faux greenery and flowers
- Let the glue dry completely, and tie the loose ends of the ribbon together.
- Now you’re ready to hang it up!