Space Saving Bunk Beds
Space Saving Bunk Beds are a great way to create unique spaces for your children, all while maximizing floor space in a room. Check out the full DIY Bunk Beds tutorial below.
Our Built In Bunk Beds idea came from knowing that our 8year-old daughter and almost 11-year-old son needed to have their own spaces. Their existing shared bedroom is huge as kid’s bedrooms go, so dividing it in half wasn’t too much of an issue, but I wanted to be sure we were using the space in the best way possible.
After scouring the Internet, I came across this idea from Ashbee Design. Both Mr. Juggling Act and I love that this structure is temporary. If we decide to sell the house later on down the road, the built in bunk beds can be easily disassembled for a buyer that might not need two smaller rooms. You’d never know that this not truly built in thanks to the sturdy construction and trim pieces hiding the gaps!
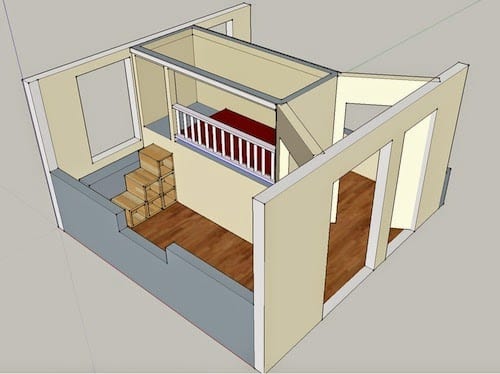
Please note that we made changes to Marji’s design (above) to create a structure that worked for our home. Likewise, you will need to take your own specific measurements for your unique space. The end result is that the kids each have their own rooms, and we are still able to take advantage of the way bunk beds save space.
What are the dimensions of a bunk bed?
A typical bunk bed has two twin mattresses. The typical twin mattress is 39 inches wide and 75 inches long, but they can vary so be sure to MEASURE before you begin your plans. I can’t stress this enough.
Remember it’s much easier (and less expensive) to start with a good plan. Take the time to create a plan and figure out your materials and dimensions BEFORE you begin.
DIY Bunk Bed Materials & Tools
Some of the items below contain affiliate links; I am a participant in the Amazon Services LLC Associates Program, an affiliate advertising program designed to provide a means for us to earn fees by linking to Amazon.com and affiliated sites. However, I only promote things that I love and think you will love, too. For more information, please see our Disclosure Policy.
Materials
- 2″ x 4″ x 8′
- 2″ x 6″ x 8′
- 3/4″ Finish/Sanded Plywood
- 1/4″ Finish/Sanded Plywood
- 3/4″ Sheet Rock, tape and Joint Compound
- Pine Trim Boards* 1″ x 4″ x 8′
- Baseboard Molding
- Wood Putty
- 1 1/2″ Sheetrock Screws
- 3″ Framing Nails
- Finish Nails
- Sandpaper
- Paint
- Painters Tape (not just for painting)
- Trim for top, bottoms and sides
Tools
- Framing Nail Gun
- Finish Nail Gun
- 10″ Table Saw or Circular Saw with a Rip-Cut Guide
- 10″ Miter/Chop Saw
- Drill/Driver or Impact Driver
- Paint Sprayer such as the Wagner SprayTech Flexio 4000 Paint Brushes
- 5″ Random Orbit Sander
- Shop Vac (So much saw dust)
- Taping Knife
- Utility Knife
- Sheetrock Saw
- Safety Glasses
- Dust Masks
- Measuring Tape, Level and Speed Square
Choosing Paint Colors
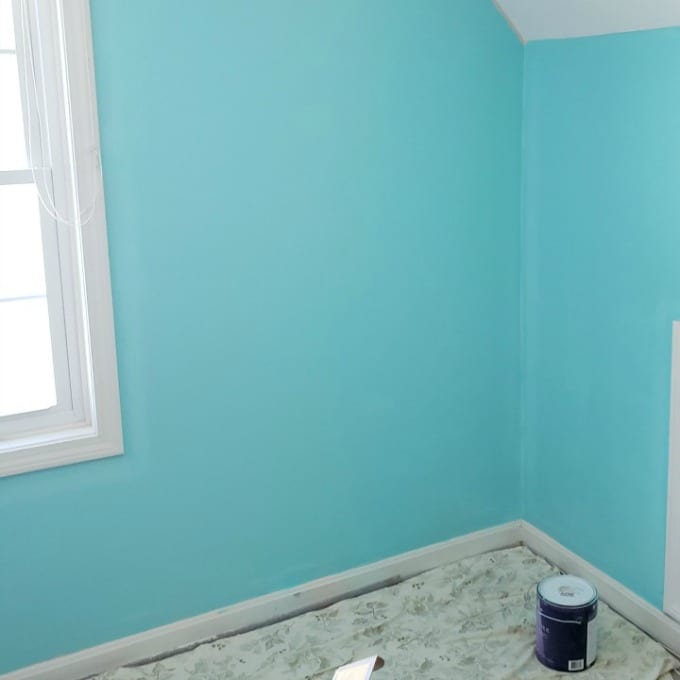
Together, we helped the kiddos select coordinating paint colors for their new room. Olivia chose Garden Fairy and Tropical Waterfall, while Ethan decided on Glacial Stream and High Dive for his bedroom. Here is some very good information on how to choose an accent wall color. We used Behr “Marquee” Paint that includes the primer to also cut down on the time for painting. The colors are stunning – the downside was it a lot of paint!
Painting
We didn’t take many shortcuts on this space saving bunk bed project. When it came time to paint though, we were only too happy to use a product that cut down man (and woman) hours!

We found that the Wagner SprayTech Flexio 4000 sprayer was very simple to use and did save us time. Here’s why we liked it:
- Lightweight and easy to use
- 15-foot Air Hose meant we could move around the room freely
- Super simple clean up which was easier than we expected
- Ability to adjust settings to get exactly what we needed

To get started with the paint sprayer, here’s what you do:
- Set the pressure control on the X-Boost turbine. This controls how much air power is created by the base.
- Next, set the material flow, which controls the amount that will be sprayed. For latex paint, you want it to be about 9-11.
- Then, change the air cap to match the direction you’re going to paint, either horizontal or vertical.
- Finally, add the paint to the cup and tighten the nozzle assembly.
We used the iSpray Nozzle since we were painting walls, but you can also use the detail finish nozzle if you’re doing smaller projects. For best results, thoroughly read through the instructions on how to assemble and use the Flexio 4000 Sprayer, and practice with the included spray poster.
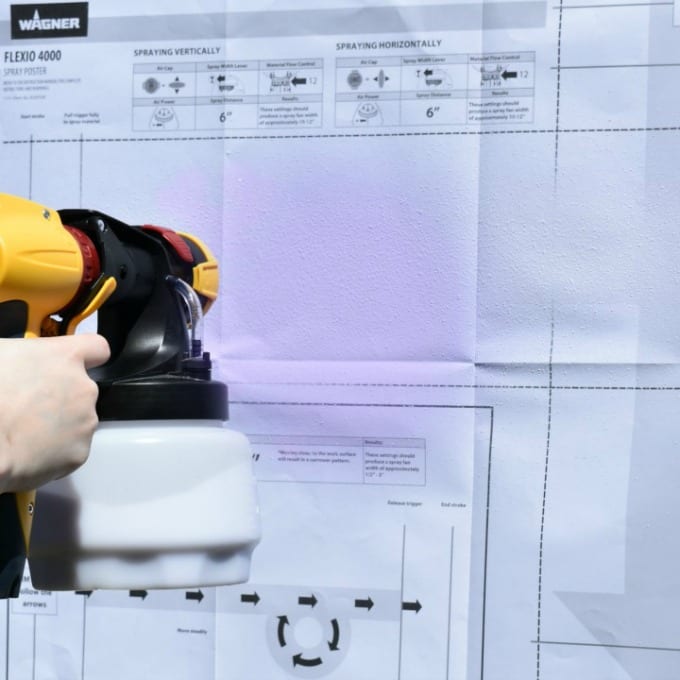
Tips for Using the Wagner Flexio 4000:
- Make sure your surface is clean. Before starting, I would recommend taping and covering areas you do not want paint on.
- There is some overspray as you might imagine. We also used a drop cloth to protect the floor.
- Hold the sprayer about 6-8 inches from the surface.
Room Design
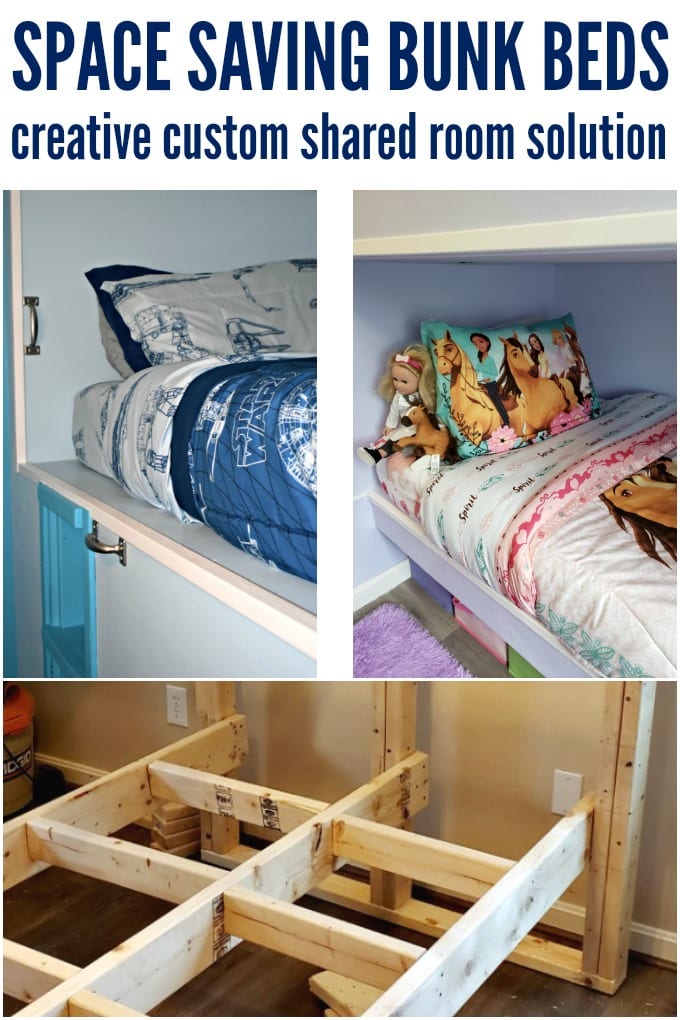
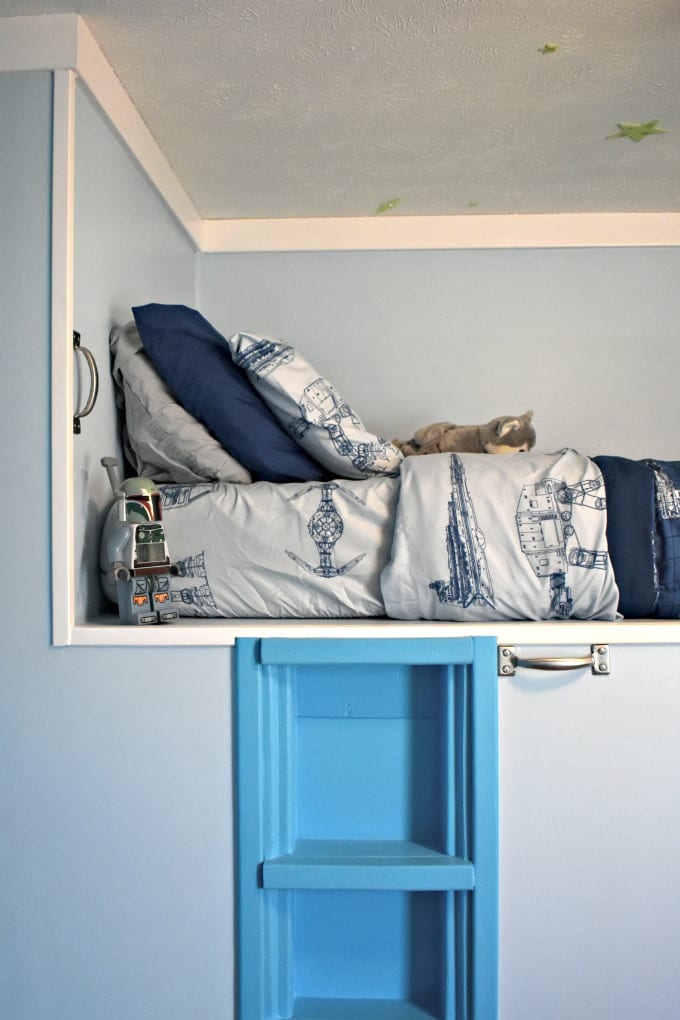
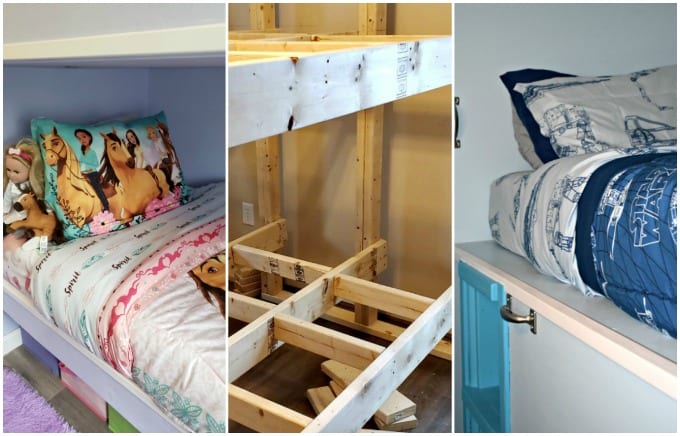
Ethan chose this awesome Millennium Falcon bedding set. With his paint colors and the bedding, there was a lot of blue, so we added some orange accents in the room. Now with dedicated spaces for his LEGOs and books, he couldn’t be happier!
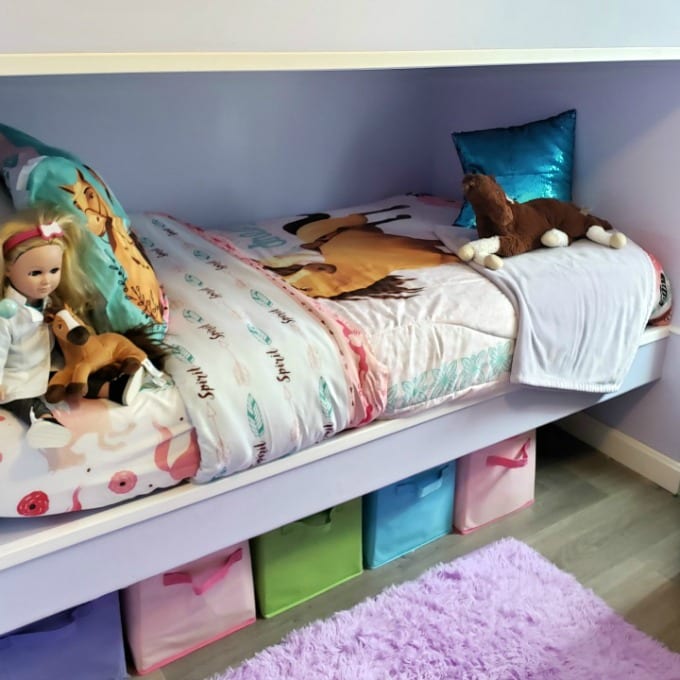
Olivia loves horses and chose this Spirit Riding Free bedding set. Her room is filled to the brim with dolls and stuffed animals, and loads of horse books and posters.
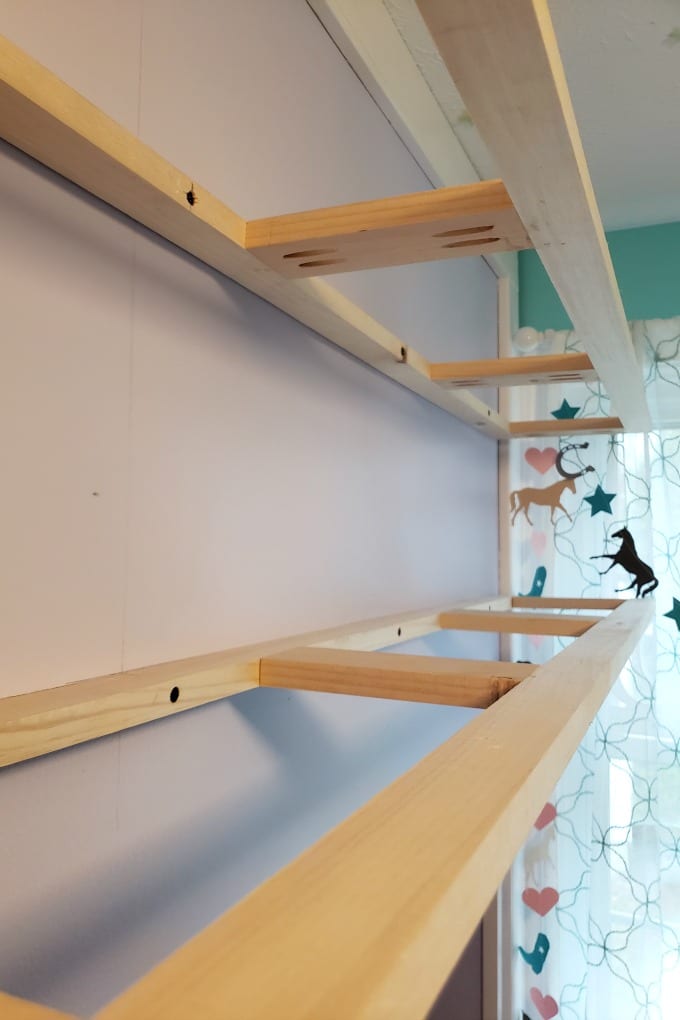
I can’t wait to show you all the floating shelves we’re building in each of the rooms. That tutorial is coming soon!
Space Saving Bunk Beds
Because of the complexity of these DIY Bunk Beds, you will need plenty of time to complete the project. While the bed framework only took a few days to put together, the whole project took us several weekends to complete. It’s tricky when you’re working on it in bits and pieces on weekends and evenings. In reality, it’s not just constructing built-in bunk beds, but creating two spaces with their own walls, doors and electrical. If you are not comfortable with any of these aspects, you may want to hire a professional. Luckily, Mr. Juggling Act and my Dad are both good at these jobs.
It is important to note that I that I am not a professional. The ideas presented here are all my own, unless otherwise credited and I have shared tips based on my experience. I always recommend consulting and/or hiring a professional if needed. Be sure to check with local building codes to obtain all permits required for any DIY project. Please always use all proper safety precautions and be sure to read and follow all manufacturer instructions. Finally, please note that I am not responsible for any outcome if you try this yourself; I am not liable for any injury or additional cost or expense incurred.
More Home Ideas:
- How to Organize Your Closet in an Hour or Less
- Gray Living Room Remodel
- Quick and Easy Bathroom Updates
- Canvas String Art
- Save an Hour on Housekeeping Every Week

DIY Bunk Beds
As an Amazon Associate, I earn from qualifying purchases.
Equipment
- Tools
- Framing Nail Gun
- Finish Nail Gun
- 10″ Table Saw or Circular Saw with a Rip-Cut Guide
- 10″ Miter/Chop Saw
- Drill/Driver or Impact Driver
- Wagner Paint Sprayer
- Paint Brushes
- 5″ Random Orbit Sander
- Shop Vac (So much saw dust!)
- Taping Knife
- Utility Knife
- Sheetrock Saw
- Safety Glasses
- Dust Masks
- Measuring Tape, Level and Speed Square
Materials
- Materials
- 2 ″ x 4″ x 8′
- 2 ″ x 6″ x 8′
- 3/4 ″ Finish/Sanded Plywood
- 1/4 ″ Finish/Sanded Plywood
- 3/4 ″ Sheet Rock tape and Joint Compound
- Pine Trim Boards* 1″ x 4″ x 8′
- Baseboard Molding
- Wood Putty
- Paintable Silicone Caulk
- 1-1/4 ″ Sheetrock Screws
- 3 ″ Framing Nails
- Finish Nails
- Sandpaper
- Paint
- Painters Tape not just for painting
- Various Trim for top bottoms and sides
Instructions
Step 1 – Remove everything from the room.
Step 2 – Acquire all your materials.
- When you purchase plywood at Lowes or Home Depot, they will cut it down for you free of charge. This saves you a little time and makes it easier to fit all your materials into your vehicle!
Step 3 – Cut the studs.
- Use a chop saw to cut down the studs for the walls – remember the old adage “measure twice, cut once!”
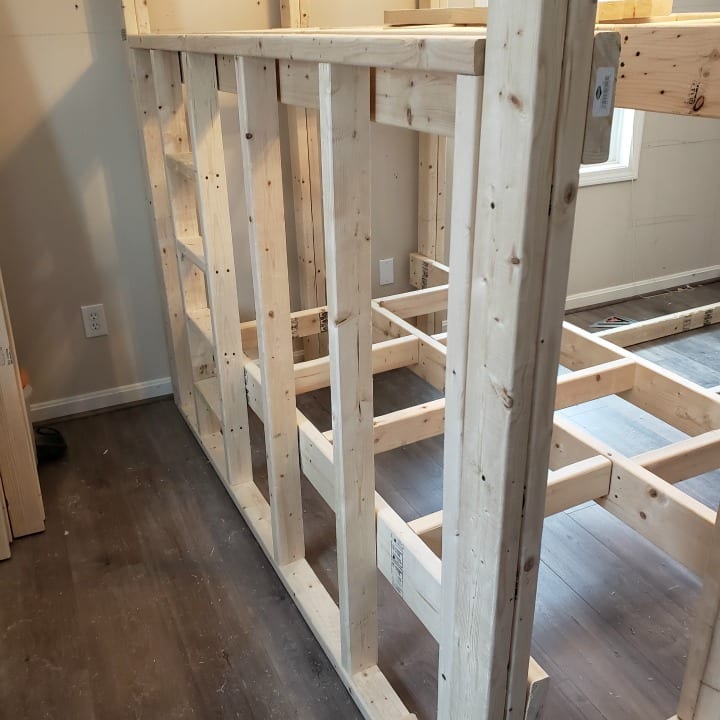
Step 4 – Build the headboard and footboard Walls.
- The header and footer are built from the 2x4x8 and are identical. Each is 47” wide and 89⅞” tall because we have 7’6” ceilings. Adjust if your ceilings are higher or lower.
- To make the headboard wall, use the framing gun to secure two of the 86⅞” studs together to make a sort of post. Repeat so you have three of these.
- Next, attach these to the top/header and bottom/footer 47” pieces. Use a speed square to make sure the walls are square.
- Repeat these steps to make the identical footer.
Step 5 – Build the mattress platforms.
- For the bottom platform, cut three 2x6x8 to 80”.
- Measure 12” from the floor and attach the 80”pieces to the inside of the three post of the headboard and footboard walls with the framing gun. The center support should go on the inside LEFT center stud.
- Cut the following lengths 2x4x8’s into four 20¼” cross members and four 16” cross members. Evenly space these between the three supports and the two walls.
- For the top platform, measure 37” from the floor then follow the steps above except that the center support should go on the inside RIGHT center stud.
- For added overall stability, we alternated the short and long sides on the platforms.
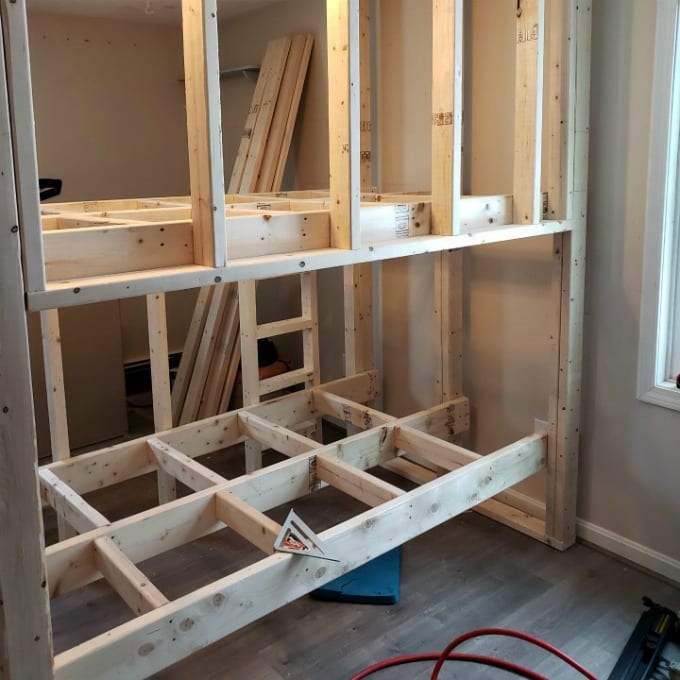
Step 6 – Build the ladder wall.
- To build the ladder wall, cut six of 2x4x8 lumber down to 50” and two pieces down to 73”. The studs for this short wall should be attached every 16” on center aside from the ladder which is 12” wide.
- From the 2x4x8 pieces, cut three 12” pieces for the ladder. Use the framing gun to attach all the pieces.
Step 7 – Attach the ladder wall.
- Use the framing gun to attach the ladder wall to the footboard and headboard walls.
Step 8 – Build the top wall.
- Cut two pieces of the 2x4x8 to 73” each. Then, cut the six studs for the top wall to 49⅞”.
- Use the framing gun to attach the top wall to the headboard and footboard walls.
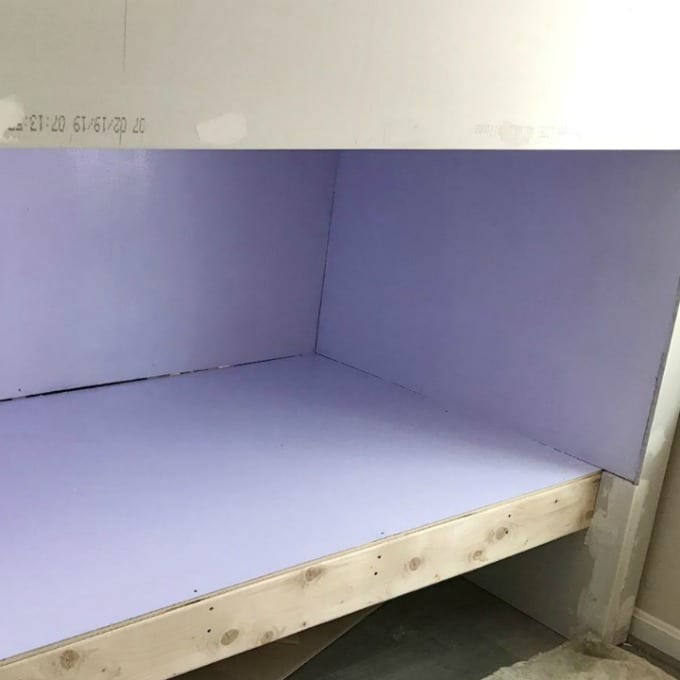
Step 9 – Attach the plywood.
- Secure the ¾” plywood to the top and bottom platforms. We used decking screws and a drill to make sure they were secure.
- Then, secure the ¼” finish plywood to the sides. If your cuts aren’t perfectly straight you may have small gaps, don’t worry it will be okay. You can use the decking screws for this step too.
Step 10 – Drywall the outside walls.
- Cut the drywall for each of the outside walls and hang with drywall screws.
- Tape and mud the seams. When the mud is dry, sand to blend the seams.
Step 11 – Prepare for Painting.
- Remove all the leftover lumber and tools that are no longer needed. Brush off the walls, then sweep and vacuum.
Step 12 – Paint the walls.
- To paint the walls in the rooms, as well as the new bunk bed walls, we used the Wagner Flexio 4000 sprayer.
- Set the pressure control on the X-Boost turbine. This controls how much air power is created by the base.
- Next, set the material flow, which controls the amount that will be sprayed. For latex paint, you want it to be about 9-11.
- We used the iSpray Nozzle since we were painting walls, but you can also use the detail finish nozzle if you’re doing smaller projects.
- Then, change the air cap to match the direction you’re going to paint, either horizontal or vertical.
- Finally, add the paint to the cup and tighten the nozzle assembly.
- For best results, thoroughly read through the instructions on how to assemble and use the Flexio 4000 Sprayer. Practice with the included spray poster.
- Before starting, I would recommend taping and covering areas you do not want paint on, and make sure your surface is clean. There is some overspray as you might imagine. We also used a drop cloth to protect the floor.
- Hold the sprayer about 6-8 inches from the surface.
Step 13 – Add finishing touches!
- Add the desired trim you would like to create a built-in look for the bunk beds. You may wish to use more decorative trim. We chose standard baseboards. To cover the larger gaps around the ceiling, we decided to router 1x4x8 pine trim because it’s very economical. Finally, to trim out the bed openings, we used simple 1-1/4" outside corner molding.
Oh my goodness this was quite the project, but what a great result! Love the tutorial and the step-by-step it really shows ho well it was thought out and how much care prep needs to be done, thank you!
Thanks for your sweet note, Deb! It was definitely an undertaking but well worth it!
This looks so great!!!!
Thanks Ashley!!
This is an incredible idea! I cannot believe it is also temporary! So inventive and unique! You must be so excited, and they must be thrilled!
Thank you so much for your sweet comment! It’s been a long time coming and I’m thrilled with the way it came out!
Wow! Such a clever and unique idea to separate one room! It is so nicely done, too!
Thank you Joanne! Definitely a big project but so worth it!
The kids LOVE their new spaces. Thanks for visiting today 🙂