DIY Holiday Wreath

Check out our beautiful and easy DIY Holiday Wreath tutorial! While we have a lot of wreath projects, this one is my favorite for the holidays.

EASY is the key word.
This wreath requires no fancy tools … and really NO tools. Okay … maybe scissors.
I know it’s not even Thanksgiving yet, but it decided to snow here two weeks ago (and the snow is still here), so I’m in the Christmas-y mood. Can’t help it. I’m usually dead set on NOT decorating for Christmas until after Thanksgiving, but all bets are off this year. I’m embracing the winter … and the snow … and have started decorating for it!
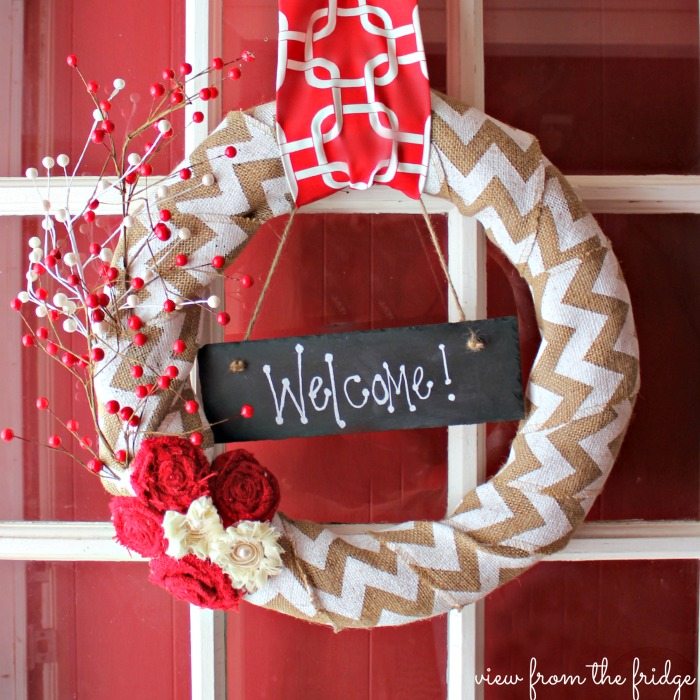
I’m going with a red, white, and grey color scheme in most of my house, and right now I’m trying hard to make it now look like a giant candy cane. I am, however, quite happy with my new front door decor … this festive wreath!
✂️🛠️ Supplies Needed
The following are affiliate links. We are a participant in the Amazon Services LLC Associates Program, an affiliate advertising program designed to provide a means for us to earn fees by linking to Amazon.com and affiliated sites.
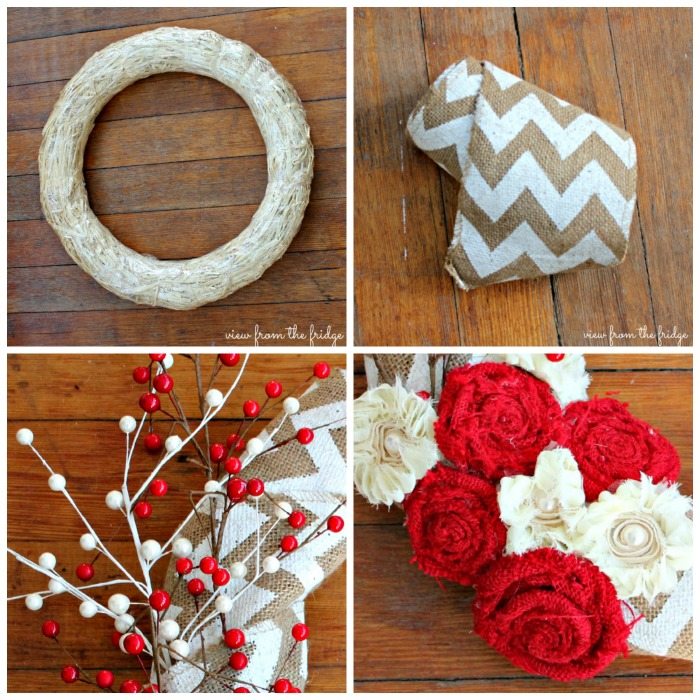
- A wreath form of some type. It doesn’t matter what it looks like (it will be covered in burlap in a minute), so buy the cheapest type you can find.
- Burlap ‘ribbon’. I found this awesome chevron ribbon at JoAnn. They have a sorts, though. Pick your fave … plain, dotted, striped …
- Berry ‘sprigs’. Mine were also from JoAnn, but they sell these things everywhere. I used three sprigs … 2 red, 1 white.
- Rosettes / flowers. You can also buy all kinds of fancy pre-made flowers and rosettes at your local craft store (check near the scrapbooking / paper crafting supplies).
- Not pictured above (because it was an afterthought … and totally optional), a slate/chalkboard plaque (again … JoAnn/Michaels/Your local craft store …).
- Stick pins (you know, the kind designed for sewing).
Now … if you bought pre-made flowers, you don’t even need GLUE for making this wreath. And it all comes together in about 5 minutes (seriously … I’m not exaggerating).
Be sure to check out my Juggling Act Mama Storefront on Amazon where you’ll find all kinds of great products that will make your life easier! Thanks so much for being a part of Juggling Act Mama ❤
📝Instructions
This is meant to be a brief overview of how to make a DIY holiday wreath. For step-by-step instructions and a full printable tutorial with materials, please scroll down to the teal box below.
- Basically … start wrapping the wreath form in the burlap ribbon until it’s covered.
- Pin the ends of the burlap to the back of the wreath with a couple stick pins.
- Grab your rosettes and flowers and stick ’em on (with stick pins again).

- Next, take your berry sprigs and shove ’em into the burlap ribbon. No need to glue or pin. Just arrange the berries until you’re happy with how they look.

- Tie in your slate/chalkboard sign and add a message.

- Hang!


Well …
Front door decorated ... check.
Now the rest of the front porch. And house. ’tis the season, my friends!
🎄 More Holiday Ideas
You might also like these other wreath tutorials the next time you’re feeling crafty:
- DIY Succulent Wreath Tutorial – gorgeous for any time of year.
- Simple Doll Pin Wreath – as versatile as it is beautiful.
- Embroidery Hoop Wreath – I love how easy this is to customize.
- DIY Flower Wreath – whimsical, easy and perfect for spring or summer!
DIY Holiday Wreath

Easy DIY Holiday Wreath
As an Amazon Associate, I earn from qualifying purchases.
Materials
- 1 Wreath form It doesn't matter what it looks like. It will be covered in burlap in a minute, so buy the cheapest type you can find.
- Burlap 'ribbon' Pick your favorite
- Berry 'sprigs' 2 red, 1 white
- Rosettes or flowers
- A slate/chalkboard plaque optional
- Stick pins
Instructions
- Start by wrapping the wreath form in the burlap ribbon until it's covered.
- Pin the ends of the burlap to the back of the wreath with a couple stick pins.
- Grab your rosettes and flowers and stick 'em on (with stick pins again).
- Next, take your berry sprigs and shove 'em into the burlap ribbon. No need to glue or pin. Just arrange the berries until you're happy with how they look.
- Tie in your slate/chalkboard sign and add a message.
- Hang!
i LOVE IT! iT’S SOOOO FESTIVE AND PRETTY 🙂 I’M SUCH A SUCKER FOR CHEVRON AND THE WAY IT POPS WITH THE RED IS LOVELY.
Looks easy and lovely!
That is such a nice wreath and your instructions make it seem so easy to make.
Beautiful. I am sure The Fabric Exchange has so many choices of great fabrics for this kind of project.