DIY Oven Mitt … Anthropologie Style!
Happy Monday, everyone! It’s Katie again from View From The Fridge, and I’m back today with an easy DIY project … a DIY Oven Mitt!
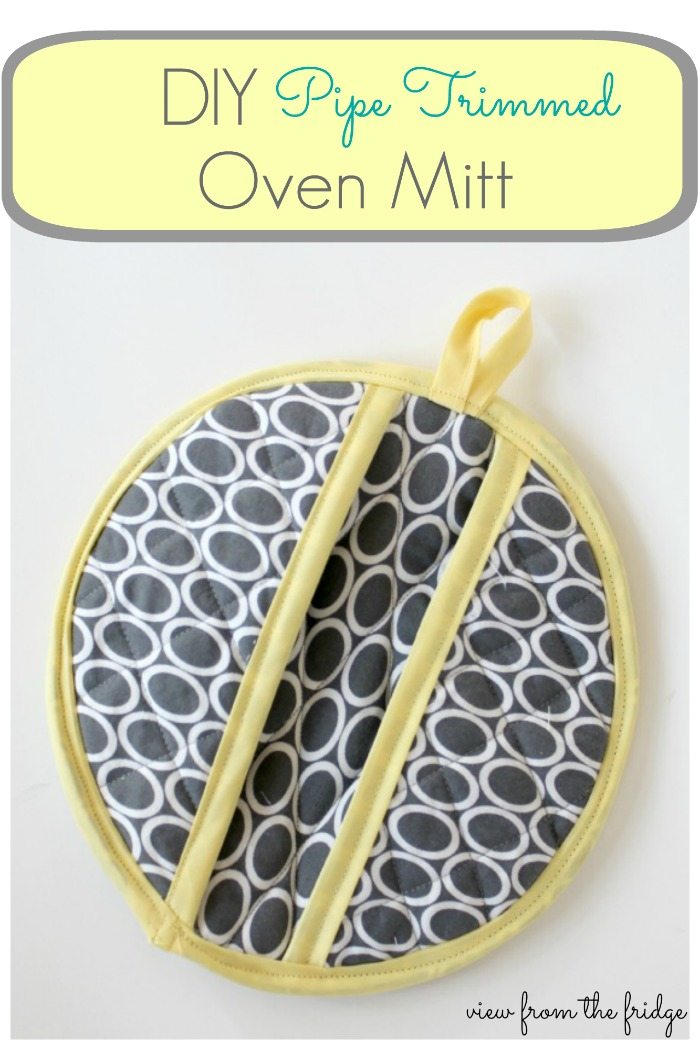
This oven mitt is actually inspired by one of my favorite stores … Anthropologie! I’ve done several Anthropologie Knock Off projects in the past, but this week I’m participating in ‘Anthro Knock Off WEEK’ with four other very talented bloggers. Each day (for 6 days), we’re each sharing a knock off project for a total of 30 projects this week!
SUPPLIES
- 1/3 of a yard of fabric of your choice (I used this fabric – Remix Grey Circles by Ann Kelle)
- 1/3 yard Insul-Bright (basically, insulated batting … sold in the fabric store near the interfacing)
- 1/3 yard batting
- Package of Double Fold Bias Tape
STEPS
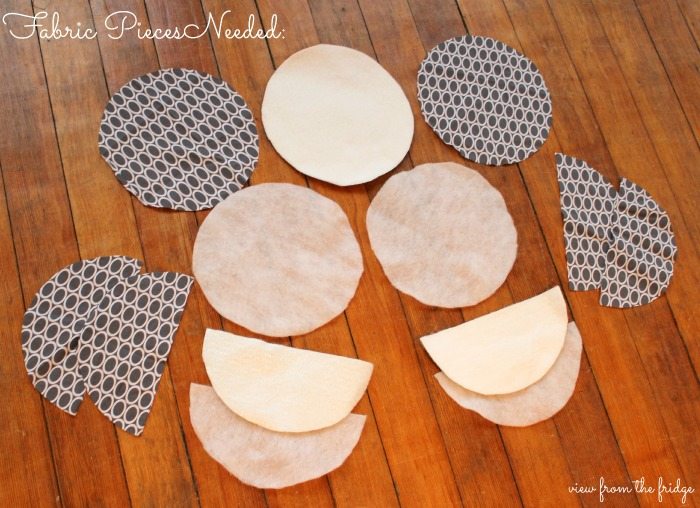
STEP 1: CUT FABRIC (this step probably takes the longest of all …)
-
- Out of Fabric: Cut four 10″ diameter circles (or about 10″ … I used a small plate for a template)
- Cut two of these circles in half (easiest to fold in half and cut along crease)
- Out of Batting: Cut three 10″ diameter circles
- Cut ONE of these circles in half
- Out of Insul-Bright: Cut two 10″ diameter circles
- Cut ONE of these circles in half
- Out of Fabric: Cut four 10″ diameter circles (or about 10″ … I used a small plate for a template)
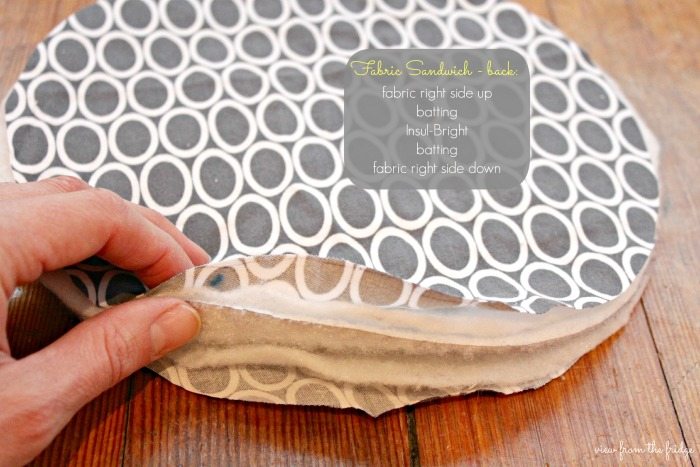
STEP 2: MAKE THREE FABRIC ‘SANDWICHES’
- For the back of oven mitt (the full circle), layer in pieces from top to bottom in the following way:
- Fabric, right side UP
- batting
- Insul-Bright
- batting
- Fabric, right side DOWN
- For the two front pieces, layer from top to bottom in the following way:
- Fabric piece right side UP
- batting
- Insul-Bright
- Fabric piece right side DOWN

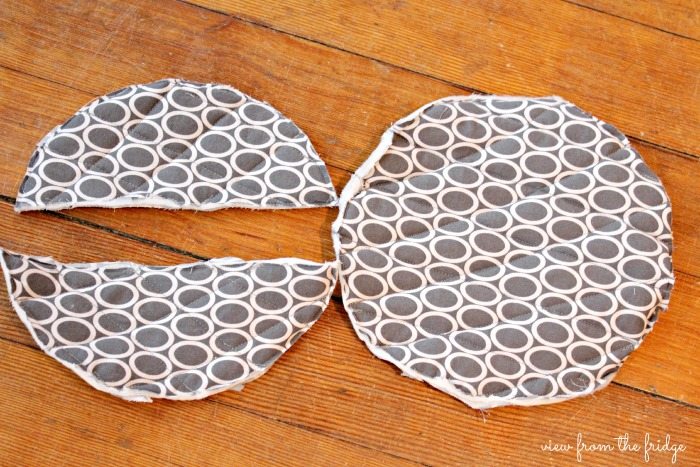
STEP 3: SEW EACH FABRIC SANDWICH TOGETHER ALONG OUTER EDGES
- For the two front pieces (half circles), first cut 3/4″ – 1″ off the straight edge of the ‘sandwich’
- Pin each sandwich together
- Sew along all outer edges (~roughly 1/4″ seam allowance)
- Trim excess fabric outside of seam

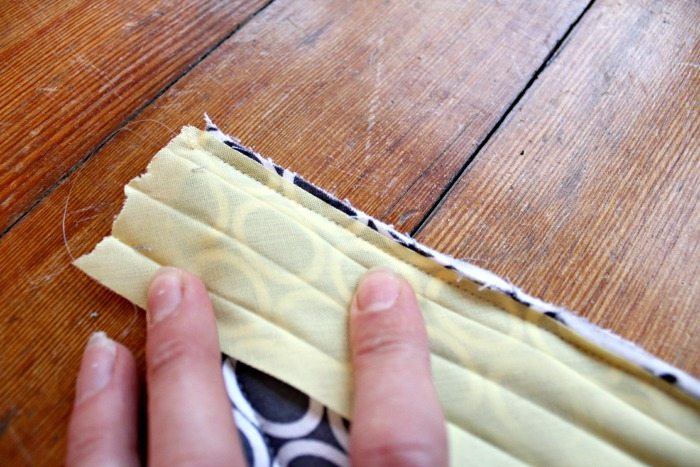
STEP 4: QUILT EACH PIECE
- Quilt each piece by sewing diagonal lines across sandwich about 1.5″ apart . You can be as exact as you like (with measured out lines) or as inexact as you like (eyeball where each line needs to be). The ladder was my method of choice.
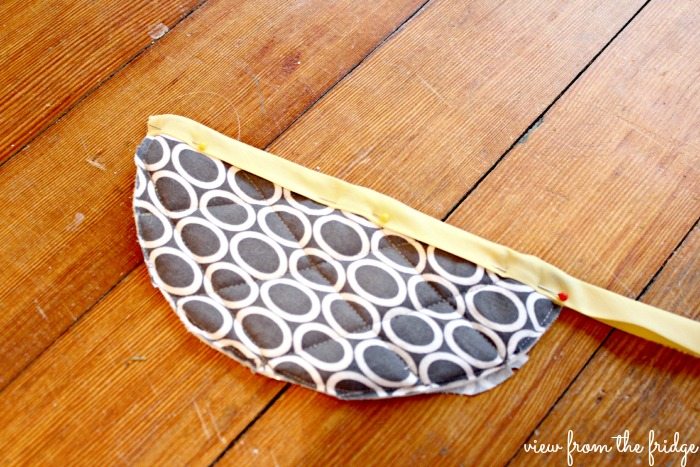
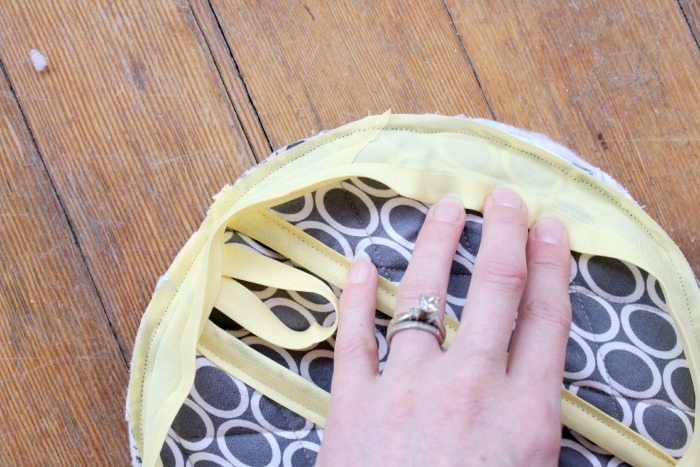
STEP 5: ADD BIAS TAPE TO STRAIGHT EDGES OF FRONT PIECES
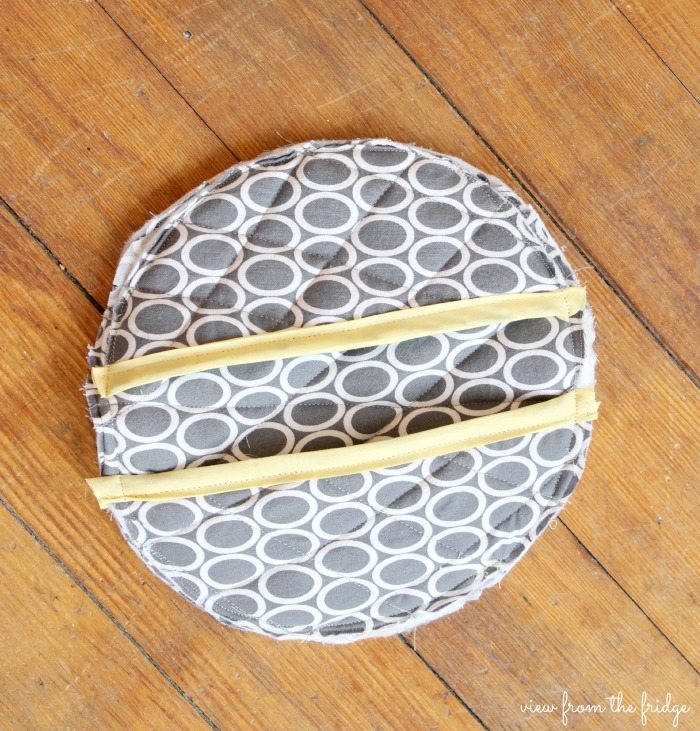
STEP 6: SEW ALL THREE PIECES TOGETHER
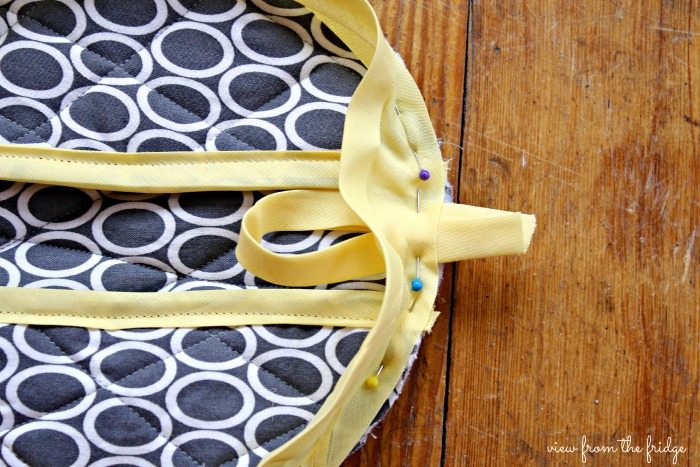
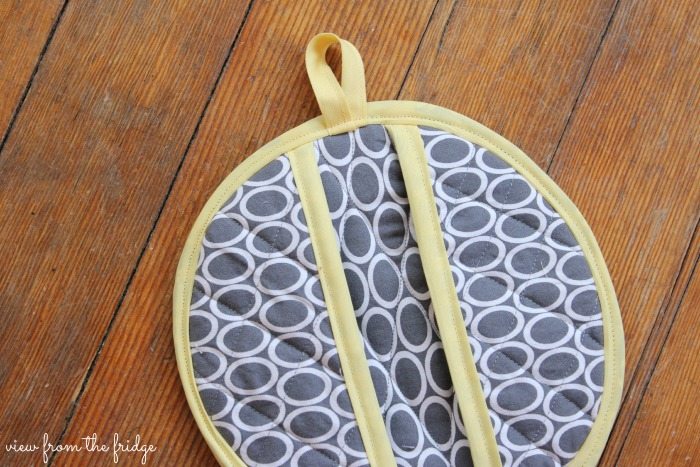
STEP 7: SEW BIAS TAPE AROUND OUTER EDGE
- Cut a short piece of the bias tape to create a loop at the top. Pin the loop facing into the center of the mitt as shown
- Carefully pin bias tape all around outer edge going right over your loop
- Sew in place.
- Fold bias tape over edge, fold loop UP
- Sew around outer edge again
THAT’S IT … OVEN MITT = COMPLETE!!
So …. How do you think it compares to the Anthro version?
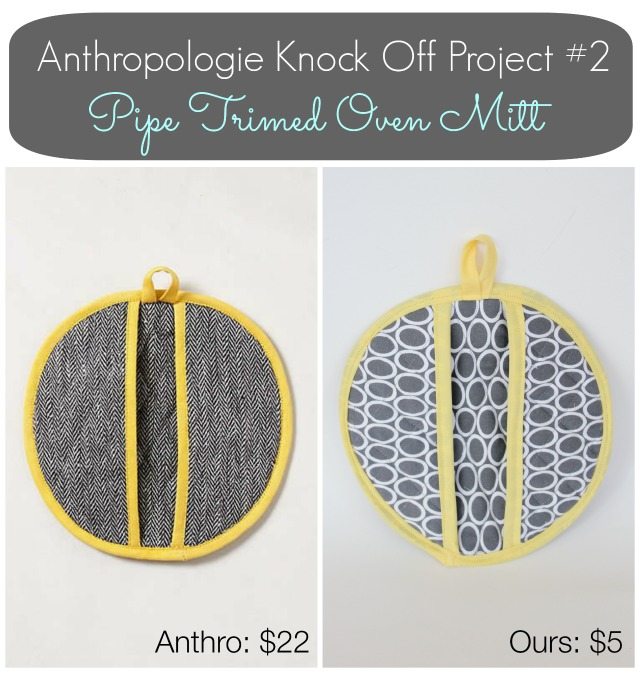
These oven mitts could be customized to any decor and would make a FANTASTIC Mother’s Day gift for a mom that loves to cook (or just loves cute things hanging around in her kitchen)!!
Thanks again to Ang for having me here today! I hope this inspired some creativity in you! If you get a chance, I’d love for you to stop by, say ‘hello’, and see what other Anthro Knock Off Projects we’re up to this week.
Until next time …
Happy Crafting!

DIY Oven Mitt – Anthropologie Style
As an Amazon Associate, I earn from qualifying purchases.
Equipment
- Pair of scissors
- Sewing Machine
Materials
- ⅓ yard fabric of your choice I used this fabric – Remix Grey Circles by Ann Kelle
- ⅓ yard Insul-Bright basically, insulated batting … sold in the fabric store near the interfacing
- ⅓ yard batting
- 1 pkg Double Fold Bias Tape
- 1 spool Coordinating thread
Instructions
MAKE YOUR CUTS
- Cut out of the fabric – Four 10″ diameter circles, or about 10″, I used a small plate for a template
- Cut two of these circles in half. It’s easiest to fold in half and cut along crease.
- Cut out of the batting – Three 10″ diameter circles
- Cut ONE of the batting circles in half
- Cut out of the Insul-Bright – Two 10″ diameter circles
- Cut ONE of the Insul-Bright circles in half
LAYER YOUR PIECES
- For the back of the oven mitt (the full circle), layer on pieces from top to bottom in the following way: Fabric, (right side UP), batting, Insul-Bright, batting, Fabric, (right side DOWN).
- For the two front pieces, layer from top to bottom in the following way: Fabric piece (right side UP), batting, Insul-Bright, Fabric piece right side DOWN.
SEW EACH FABRIC SANDWICH TOGETHER ALONG OUTER EDGES
- For the two front pieces (half circles), first cut ¾” – 1″ off the straight edge of the ‘sandwich’
- Pin each sandwich together
- Sew along all outer edges (~roughly ¼” seam allowance)
- Trim excess fabric outside of seam
QUILT EACH PIECE
- Quilt each piece by sewing diagonal lines across sandwich about 1.5″ apart . You can be as exact as you like (with measured out lines) or as inexact as you like (eyeball where each line needs to be). The ladder was my method of choice.
ADD BIAS TAPE TO STRAIGHT EDGES OF FRONT PIECES
- I happily discovered that sewing double-fold bias tape onto these pieces was incredibly easy!! I followed this great tutorial from the Angry Chicken Blog (that name makes me laugh every time…). She walks you through the process with an easy-to-follow video.
- Open up bias tape and sew along edge.
- Fold the bias tape over the edge, pin in place, then sew another seam right over the top
SEW ALL THREE PIECES TOGETHER
SEW BIAS TAPE AROUND OUTER EDGE
- Cut a short piece of the bias tape to create a loop at the top. Pin the loop facing into the center of the mitt as shown
- Carefully pin bias tape all around outer edge going right over your loop
- Sew in place.
- Fold bias tape over edge, fold loop UP
- Sew around outer edge again
FINISH AND ADD LOOP
- Pin loop at top of mitt, facing into center. Pin bias tape around the outer edge.
- Sew your bias tape on and trim the ends of the loop.
- Fold bias tape over the edge. Fold the loop up, and sew around the outer edge.
This is so cute! I love the fabric you used. I need to make some of these to match my kitchen.
Great tutorial. Love the fabric
Thanks for stopping by Marni! Have a great week!
Super cute mitt! Thanks fr the great tutorial!
You’re welcome!! By hanks so much for the comment and for stopping by today!
I need these plus they are seriously adorable! Great tutorial! Love your apron too!
~ Ashley
These are so cute and I like yours better! Totally adorable. Thanks for linking up at The Creative Collection!
Thanks Marie! Have a great week, and thanks for stopping by!
I love this so much! My oven mitts are getting ragged and worn — definitely time for some new ones, but I can never find just the right patterns to go with our aesthetic. You’ve inspired me to make my own!
HI Marlynn! It really is simple and pretty quick to make your own. And … they work great (sort of key, I guess). Thanks for the comment! Have a great week!
Thank you for this great tutorial. I want to make one….pinned!
Kathi
Thanks for stopping by, Kathi! Good luck if you decide to make one, and thanks for pinning! Have a great week!
Lovely! I’m not a gifted person when it comes to sewing bias tape. Yours is perfect! I love the fabric you used – so fun with the yellow trim. What a great knock-off!
Blessings,
Kim
Thanks, Kim! I’m not gifted either … but this method was really easy!! Glad you like the knock off! It was so fun to make! Have a great week!
XO,
Katie
Oh, Katie, this is so pretty! It caught my eye right away. Thank you for sharing at Project Inspire{d} ~ pinning and stumbling. Now I just need to make one ~ adding to my list.
Love this tutorial! I’m a beginner sewer and once you added the bias tape I got a bit lost. Can I do this without the bias tape? Or is it necessary?
Thank you for the easy to follow instructions and photos! I enjoyed this little project and the oven mitt looks great!